For my birthday this year, we did a weekend getaway to Walt Disney World. At…


How to Create an Inspirational Word of the Year Mini Album
This inspirational Word of the Year Mini Album is easy to create and will help you stay inspired and motivated all year long. By incorporating quotes and inspirational messages, you’ll be super-charging your intentions and empowering your goals.

What is a Word of the Year?
A Word of the Year is a word that sets the tone or mood for your year. It’s almost like setting a theme. And by creating this theme, it helps you illuminate your intentions and goals.
Think about what you want to achieve, how you want to live, and your overall why or reason for these choices.
This word will help you remember those objectives and help you stay on track.
How do you choose your Word of the Year
So, again, it’s like a theme.
For example, say you decided 2019 is going to be “THE YEAR OF YES!” That’s your theme.
You’re telling yourself you want to have an open-minded year, a year of new experiences, maybe a year of freedom.
So, take those adjectives { YES, OPEN-MINDED, FREE/FREEDOM, EXPERIENCES) and make one of those (whichever you want) your Word of the Year!
Display your Inspirational Word of the Year
Then you DISPLAY it.
You can do something as simple as displaying it in your daily planner.
Or writing it on a note on your bulletin board

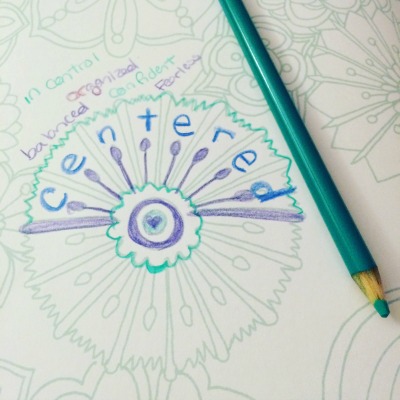
This year, I wanted to do something a little bit more inspiring. Something that would speak to me every day in different ways. My word this year is CONQUER and for a word that mighty –I knew I had to go bigger than usual.
Creating an Inspirational Word of the Year Mini Album

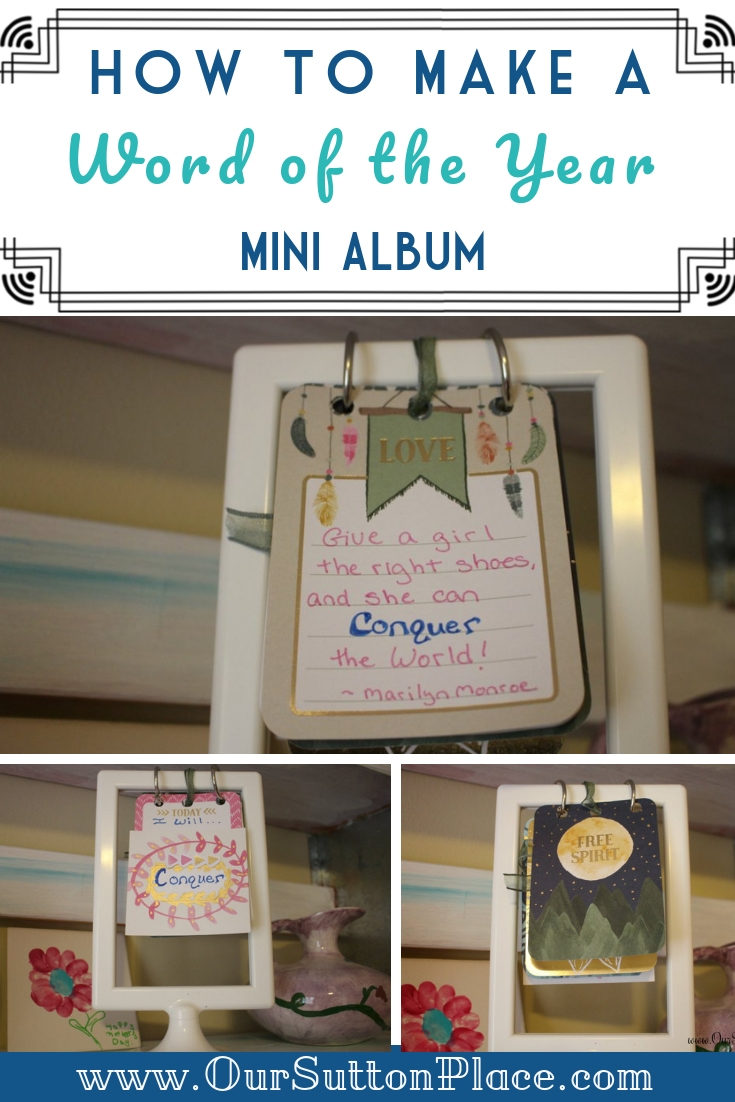
A few years ago, I came across a super cute scrapbook idea from scrapbook designer Paige Taylor Evans. She used the Tolsby frame from Ikea to make a flippable mini album. I absolutely loved this idea and went out and bought a bunch of Tolsby frames to make my own and gifts for family members. (Bonus-They’re only 99 Cents! Whaat?!)
This is where I should insert a picture of all those cute mini Tolsby albums I made, right?
Yeah—ummm…about that…I never got that far. Ugghh #MomLife
Until now!
I was looking at my sad, little, lonely Tolsby frame crying out to be used and realized “This will be perfect for my Word of the Year craft!”
…and so now I present to you….<drum roll please>….
The Inspirational Word of the Year Mini Album!

Don’t forget to Pin It for Later!
How to Make Your own Word of the Year Mini Album
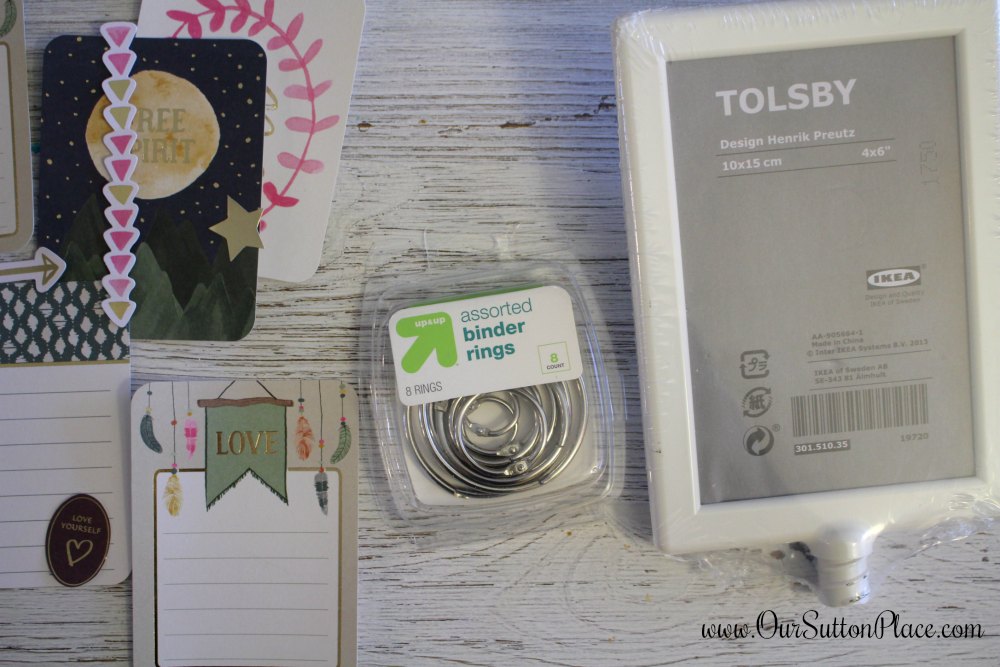
Supplies:
- About 5 pocket pages/journaling cards (If you don’t have journaling cards, use 3 X 4 pieces of scrapbook paper or colored card stock)
- Scrapbook tape
- Nice pen/marker
- 2 binder rings
- Hole punch
- Optional: ribbon
- Tolsby frame from Ikea
- Your choice of scrapbook ephemera (ex: number stickers, stamps, number letters, etc)
Some Notes before we begin:
Note 1:
A simple design trick that will help connect your different cards, quotes, and word is to use coordinating colors. So try and pick pens/markers that coordinate with your pocket sized cards.
I chose dark pink and blue because they were handy and coordinated nicely with the cards I had chosen.
Note 2:
Remember—Keep it Simple and Fun. Don’t overthink it, or you’ll never get it done.
And remember, it doesn’t have to be Pinterest-Perfect or Instagram-Incredible. This is for YOU, so do what makes you happy.
If you just have time to handwrite something, handwrite the text. Don’t worry about it being perfect brush-script. Just get it done!
Alright! Let’s Begin!
Instructions
Step 1: Find Quotes related to your Word of the Year.
Once you’ve chosen your word of the year, do an online search for quotes with that word.
Save your favorites.
You can type them into a word doc or make a private Pinterest board, or simply write them in a notebook (this is what I did).
Step 2: Write your Word of the Year on a pocket page.
You can either do this by hand or type it in and Word then print and cut/paste. Whatever you feel is easier. Or you can use alphabet stickers.
I recommend writing your word free-hand because I personally feel that it gives you more power and creates more of connection to you and the word.

But if you really don’t like your handwriting or want to use a font that speaks more to your word, then by all means type it up, print it out and paste it to your pocket card.
Remember—this is NOT for Instagram. This is for YOU. So, make it look pretty, make it feel right, but don’t sweat it if it doesn’t look perfect.
Write out Your Quotes
Grab some pocket cards that have lines for journaling or open spaces for journaling and write out your quotes.

Step 4: Punch 2 holes in each card.
You want to punch 2 holes in your cards because that will stabilize them better than just 1.
I made the mistake of initially just punching 1 hole in the center and then realized it slipped off the frame. (I tried to cover-up this mistake by incorporating a pretty ribbon in the center hole.) By having two holes, it creates tension and keeps the cards centered.
Hole Punching Tip:
To ensure all the holes line up evenly, I punched 1 card with two holes and this card became my “template.” Next, I placed this card on top of a few other cards and punched them all at once. I repeated this until all of my cards were punched.
You could also probably just measure it, but this way worked really well for me. It was fast and easy.
Step 5: Take apart the Tolsby Frame
Open the frame as if you were going to place a picture in it, but instead just take out the plastic cover and paper insert. Now you have an open frame that you can use for your Flippable Word of the Year.
Step 6: Decide how you’d like to arrange your pocket cards
I created a title card with the year on the front, but this is completely optional. Personally, I just liked how it looked.
There is no rhyme or reason to how you arrange the cards.
Just go with whatever feels right.
I even added a card (“Free Spirit Graphic”) that had little to do with my word Conquer but it made me feel really good so I put it towards the back almost as a final thought.

Step 7: Attach your pocket cards to the frame via the binder clips
Grab your binder clips and feed them through the pocket cards. Before you close the clips, attach them to the frame.
Step 8: Display and enjoy!
Display your Inspirational Word of the Year Mini Album in a place where you can see it and be inspired by it every day.
Let its positivity guide you and remind you that YOU’VE GOT THIS!
Yield: 1
How to Create an Inspirational Word of the Year Mini Album
This inspirational Word of the Year Mini Album is easy to create and will help you stay inspired and motivated all year long. By incorporating quotes and inspirational messages, you’ll be super-charging your intentions and empowering your goals.
Prep Time
30 minutes
Active Time
30 minutes
Total Time
1 hour
Difficulty
Easy
Materials
- About 5 pocket pages or 3 X 4 pieces of scrapbook paper or colored card stock
- Scrapbook adhesive
- Nice pen/marker
- 2 binder rings
- Optional: ribbon
- Tolsby frame from Ikea
- Your choice of scrapbook ephemera (ex: number stickers, stamps, number letters, etc)
Tools
- Hole punch
- Paper Cutter
- Scissors
- Scrapbook tape adhesive
Instructions
Step 1: Find Quotes related to your Word of the Year.
Once you’ve chosen your word of the year, do an online search for quotes with that word.
Save your favorites.
You can type them into a word doc or make a private Pinterest board, or simply write them in a notebook (this is what I did).
Step 2: Write your Word of the Year on a pocket page.
You can either do this by hand or type it in and Word then print and cut/paste. Whatever you feel is easier. Or you can use alphabet stickers.
I recommend writing your word free-hand because I personally feel that it gives you more power and creates more of connection to you and the word.
Step 3: Write out Your Quotes
Grab some pocket cards that have lines for journaling or open spaces for journaling and write out your quotes.
Step 4: Punch 2 holes in each card.
You want to punch 2 wholes in your cards because that will stabilize them better than just 1. By having two holes, it creates tension and keeps the cards centered.
Tip: I punched 1 card with two holes; this card became my “template.” Next, I placed this card on top of a few other cards and punched them all at once. I repeated this until all of my cards were punched. This ensured that all of the holes lined up perfectly. You could also probably just measure it, but this way worked really well for me. It was fast and easy.
Step 5: Take apart the Tolsby Frame
Open the frame as if you were going to place a picture in it, but instead just take out the plastic cover and paper insert. Now you have an open frame that you can use for your Flippable Word of the Year.
Step 6: Decide how you’d like to arrange your pocket cards
I created a title card with the year on the front, but this is completely optional. Personally, I just liked how it looked.
There is no rhyme or reason to how you arrange the cards.
Just go with whatever feels right.
I even added a card (“Free Spirit Graphic”) that had little to do with my word conquer but it made me feel really good so I put it towards the back almost as a final thought.
Step 7: Attach your pocket cards to the frame via the binder clips
Grab your binder clips and feed them through the pocket cards. Before you close the clips, attach them to the frame.
Step 8: Display and enjoy!
Display your Word of the Year Mini Album in a place where you can see it and be inspired by it every day. Let its positivity guide you and remind you that YOU’VE GOT THIS!
Tell Your Story-Live Creatively

Sign up for our newsletter and receive the On-The-Road Photography Checklist! Never miss another important photo opportunity again.
HI! I’m a Shana, self-proclaimed Media Mixologist, wife, and mom to two little girls. I love to mix up cocktails of crafts, recipes, wellness, family and business with just the right amount of sparkle to help you shine everyday. So, grab a glass, and let’s celebrate the cocktail of life!
Leave a Reply